Thursday, April 14, 2011

The Need to Feed...

Everyone has their own special way of expressing love, don't they?


Whether it's hand-holding and a heartfelt Hallmark or skywriting and something that sparkles, isn't wonderful to be shown how much you are loved?


Charlie? It appears, he prefers to say it with Charmin.  Yes, this is the love note I awoke to the other morning...it's perfect and it made my day.


Me, on the other hand? I find the need to say it with soup...and bread, and cookies and pies and jam and pickles...anything made by my hands and with my heart.


The rolls Will and I made for Grandpa Ole's 80th.

But love, it seems, isn't the only emotion that fires up my burners.


When I'm angry and the world seems cold and wrong, there's nothing like beating a big wad of stiff bread dough into submission then watching it transform into something warm and soft and pure and good.


When I'm frustrated that I don't have the power to cure my kid's croupy cough, I take up arms with a stock pot and a raw chicken and proceed to fill the house with steamy goodness and the eternal hope that chicken soup really does cure everything that ails you.


When I feel guilty about cancelling Sunday night dinner with the in-laws...again...I make a lasagna and leave it on their doorstep.


When I'm worried about one particular friend, I make her butterscotch pudding. When I'm happy for another, I make her cupcakes with sprinkles. And when I get the news that yet another is bracing herself for a round of chemo, I know that sweet and creamy baked custard (the one that my mother-in-law makes for me when I'm sick) is one of the only things that will soothe and settle and nourish.


Sad?
Tired?
Lonely?


Chocolate.
Chocolate.
Chocolate.


Put simply...I have the need to feed.


I don't know what it is about cooking for the people I love...


Is it that cooking gives me power to do "something", to somehow try to "fix-it", when all too often life is completely out of control?


Is that I have an even greater need to feed my own ego as I eagerly anticipate the gratifying sights and sounds of my friends and family enjoying the fruits of my labor ?


Is it that I love to eat so much that I'll take any excuse to open a bag of chocolate chips?


I don't know for sure but I'm guessing the answer, quite simply, is: yes, yes and yes.


It's what my mother does. It's what I do. And, quite frankly, I could think of less productive ways to work through my issues! Ya think?


Mom and I with the Jack-O-Lantern cookies we made for Kindergarten.


Mom and I teaching a kids' cooking class.

So, the other day, I got a wonderful email from a friend who is two months into a long recovery from a brutal car accident. It seems that their scheduled homemade meal deliveries had come to an end and my name was on a list of those who signed up to help out but didn't yet have the chance...and I jumped!


One of my favorite meals to deliver a home bound friend and their family is pozole with all of the fixins'. It's an authentic, Mexican, one-pot pork and hominy stew which is surprisingly simple to make yet rather fun and spectacular when adorned with all of the fresh toppings that go with it. I like to surprise my friends with it when I know that they just can't take another Pyrex full of lasagna or creamy chicken casserole! I always make a double batch and we eat it for days too and freeze a little for later.


It starts with dried New Mexico chiles...they're pretty mild as chiles go but still have a little kick. I couldn't believe it when both of my kids gobbled the pozole up the first time I made it (they call it Mamma's Spicy Soup). They're not culinary wimps mind you but they are kids none the less...I think there is something magical about this stuff.


After the chiles are soaked, they're blended with onion and garlic to make this killer, potent, puree that gets dumped into the stock pot with the pork that has been simmering for a while...


Here's what the pork looks like when it comes out of the pot. It has been simmering with chicken stock, water, Mexican oregano and enough garlic to ground a coven of vampires, then removed, cooled, shredded, and added back to the stock with lots of hominy and the chile sauce.


Once everything is added back to the pot it's almost ready to go. While it simmers, you are preparing all of the tasty stuff that gets piled on top to your liking...diced onion and radish, avocado, shredded Romaine, lime juice, and...


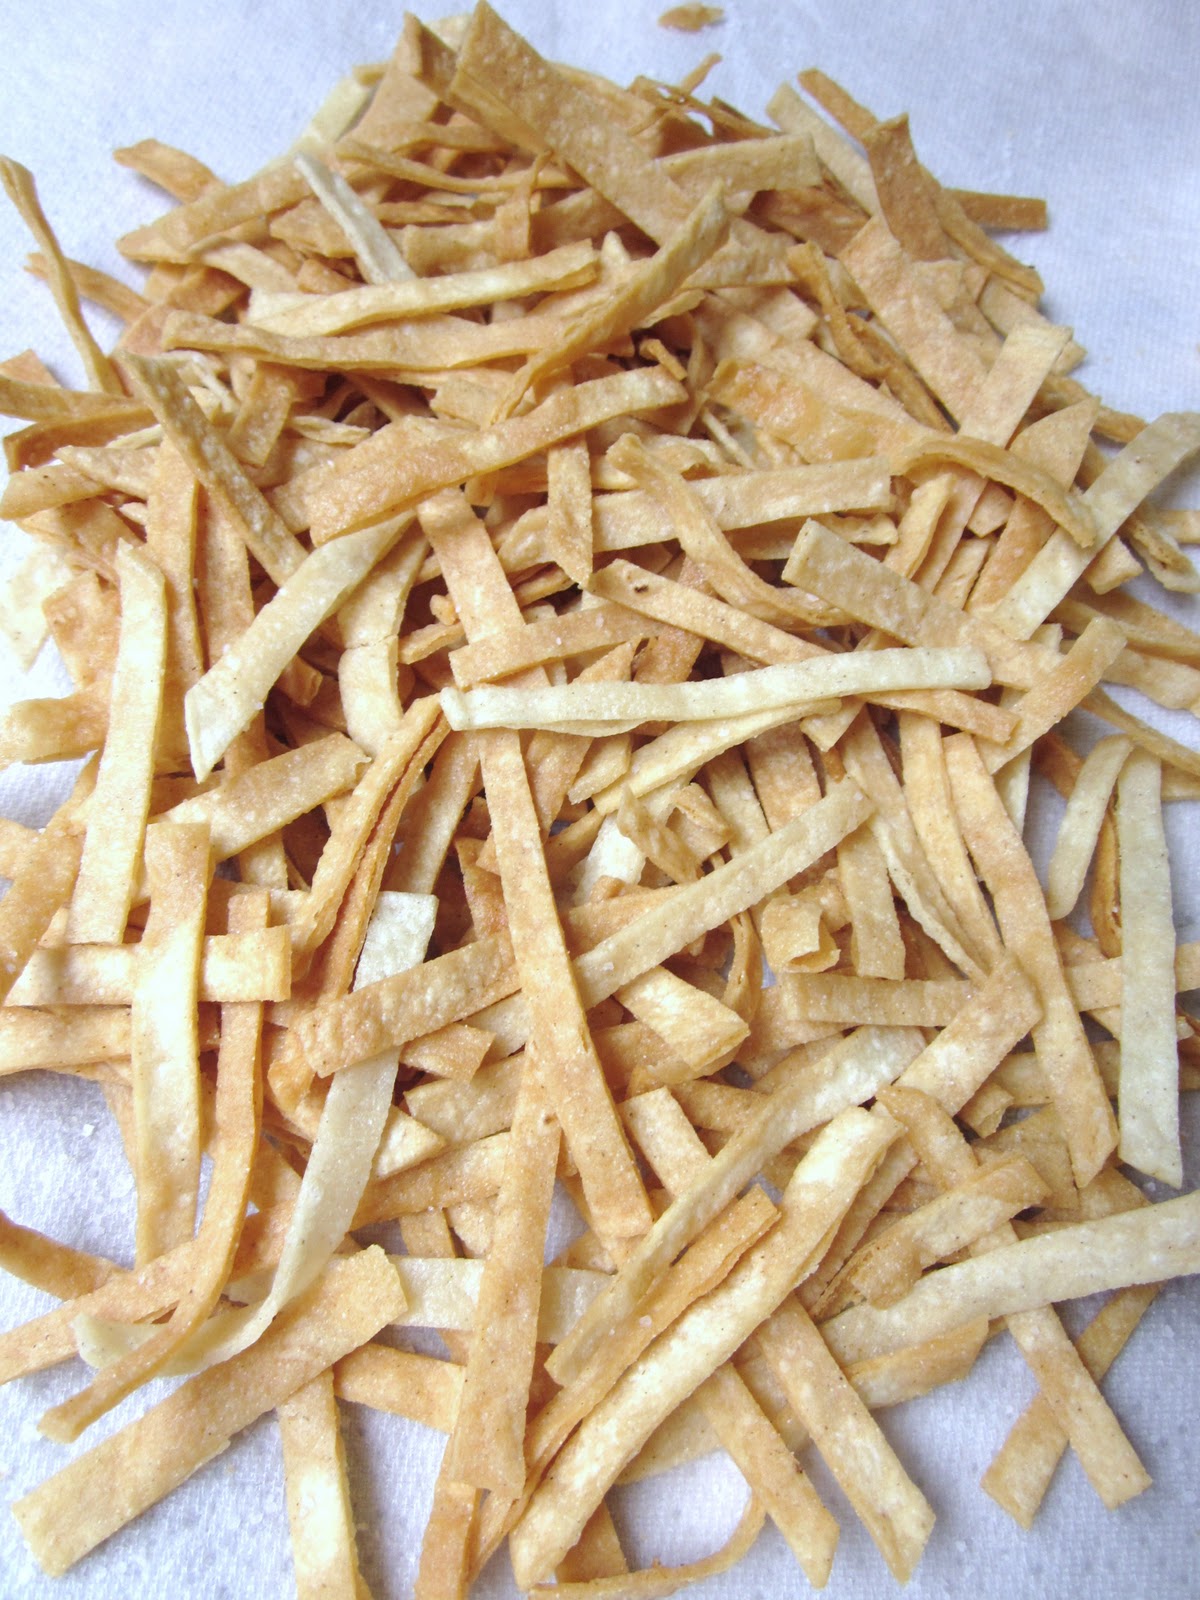
...this is the best part...lot's of freshly fried tortilla strips sprinkled with salt.


Here's how I like mine. I just love the combination of warm and hot, spicy and cool, stewed and fresh.


Pozole Rojo (Mexican Pork Stew)


Ingredients:

 
• 1 large head garlic
• 12 cups water
• 4 cups chicken broth
• 4 pounds country-style pork ribs
• 1 teaspoon dried oregano crumbled
• 7 dried New Mexico red chiles (2 ounces)
• 1 ½ cups boiling-hot water
• ¼ large white onion
• 3 teaspoons salt
• 3 15-ounce cans white hominy
• 8 corn tortillas
• 1 ½ cups vegetable oil


• Accompaniments: diced avocado, thinly sliced romaine lettuce, chopped white onion, diced radishes, lime wedges, fresh cilantro, sour cream


Directions:

Peel garlic cloves and reserve 2 for chile sauce.


Slice remaining garlic. In a 7- to 8-quart heavy kettle bring water and broth just to a boil with sliced garlic and pork. Skim surface then add the oregano. Gently simmer pork, uncovered, until tender, about 1 1/2 hours.


While pork is simmering, discard stems from chiles and in a blender combine chiles with boiling-hot water. Soak chiles, turning them occasionally, 30 minutes. Cut onion into large pieces, add to the blender and purée with chiles and soaking liquid, reserved garlic, and 2 teaspoons salt until smooth.

Transfer pork with tongs to a cutting board but save the broth mixture! Shred pork the pork when cooled, and discard bones. Rinse and drain hominy. Return pork to broth mixture and add chile sauce, hominy, and remaining teaspoon salt. Simmer pozole 30 minutes and, if necessary, season with salt.

While pozole is simmering, stack tortillas and halve. Cut halves crosswise into thin strips. In a skillet heat 1/2 inch oil until hot but not smoking and fry tortilla strips in 3 or 4 batches, stirring occasionally, until golden, 1 to 2 minutes. They get dark fast so watch 'em! Transfer tortilla strips with a slotted spoon as they are fried to paper towels to drain (I place my paper towels over a flatened brown grocery bag for added absorbtion). Transfer tortilla strips to a bowl.

Serve pozole with tortilla strips and bowls of accompaniments.

Serves: 8

Adapted from Gourmet Magazine


Note: This is a great do-ahead recipe. Make the pozole a couple of days in advance, no problem. Fry the tortillas the day before and prep all of the fixins' morning of.


Thursday, March 17, 2011

Caraway and confessions...

Bless me Father for today I ate half a loaf of Irish Soda Bread.

This morning on the way to school, the kids reminded me that tonight's corned beef and cabbage dinner would not be complete without that soda bread I make every year. Do I really make it every year...well, if they say so...

Anyway, God forbid that I disappoint, so I ran back home, mixed up a double recipe (miraculously I had almost everything I needed on hand and improvised the rest) and fashioned three loaves: one for us, one for my momma and one for my neighbor. 

As I slid the loaves into the oven, the phone rang. It was that same neighbor calling for the recipe!  How fun that I was able to offer her instead a piping hot loaf delivered to her doorstep. Yep, it's true, I really am that easily amused.

About and hour later the aroma of toasted caraway seeds, sweet juicy raisins and tangy, browned buttery dough wafted out of the oven, crept up the stairs and tapped me on the shoulder, calling me down to take the loaves out to cool.  I had every intention of waiting to eat our little loaf with dinner but, alas, the temptation was too great and I am too weak.  I sliced right in and and slathered a big chunk (the end piece, my favorite) with perfectly softened sweet butter that had been left out on the counter since this morning's green pancake feed.

Yes, I did save some for Charlie and the kids (and maybe just a little more for me). Dad already picked up his loaf to take home to Mom and I'll make the neighbor delivery on the way to pick up Willy from school.  In the meantime, let me shut up and give you the recipe in case you have time to whip up a loaf before your corned beef comes out of its briney bath.  Happy St. Patrick's Day everyone!


Irish Soda Bread

Preheat oven to 350°

Mix and let stand 5 minutes:
  • 1 1/2 cups whole milk (I had 2% and a little cream which worked fine)
  • 1/3 cup apple cider vinegar
Whisk together in a large bowl:
  • 3 cups flour
  • 1 tsp. kosher salt
  • 1 tsp. baking soda
  • 1 tsp. baking powder
Cut in with two knives or a pastry blender:
  • 4 Tbs. cold unsalted butter
Mix in:
  • 1 cup wheat bran (I used a combo of oat bran and whole wheat flour which worked fine)
  • 1/8 cup caraway seeds
  • 1 cup raisins

Add the milk/vinegar mixture and mix together until just combined but still sticky. Turn out onto a clean, floured counter and pat into a round dome. Place on a baking sheet lined with parchment or a Silpat, sprinkle with a little flour and cut an X into the top of the loaf (about 1/2 inch deep or so).

Bake, turning around half way through, about 70 minutes or so until browned and a tester inserted in the middle comes out clean.

Note: I made a double recipe which made three nice, smaller-sized loaves. Bake time was about 50 minutes for the smaller versions.

Wednesday, February 23, 2011

Honey Buns

It was 1974 and his name was Matt...I was in 5th grade and he was my first crush. He had wavy hair, sparkly blue eyes, big teeth that were too big for his head and a face full of freckles. He looked a lot like this.

You might recall that 5th grade is the year we all studied American History. My groovy teacher was Ms. Hartnett and she wore short polyester skirts, Leggs suntan pantyhose and "open-toed" platform shoes...she was almost as cool as Lori Partridge. Anyway, that year, she came up with the bright idea that her students would put on a presentation for our parents where the boys and girls would pair up as famous "first couples" and depict life in the White House during each respective era. The couples would be drawn randomly...at least that was the plan.

Matt reached into the hat and pulled President Harding. President who? Whatever.

I reached in and pulled the name Sarah Polk, but it only took the bribe of two week's worth of Lady Baltimore devil's food cake from my bag lunches to trade Lori Merrill for the slip bearing the name Florence Harding.  I can't remember much about the presentation itself, but I do remember that the cotton balls Matt had cleverly stuck to his bald wig to simulate grey hair kept falling off...and I got to hold his hand.

Matt moved away that summer and so did my fleeting crush, but I did eventually find the true freckle-faced boy of my dreams. Yep, that's him in the upper left. That's little Charlie Christensen.

It was eight years after the infamous Parade of Presidents and I met him at our off campus dorms my first day at UC Davis. At the time, he looked a little more like this. Was he badass or what? Did I mention he drove a cobalt blue Scirocco with a big white Starsky and Hutch stripe down the side?


Little did I know he was the reincarnation of my first crush. The freckles had faded (just a little) and his head had grown into his teeth, but that sparkle in his blue eyes and his San Rafael High Bulldogs football half jersey (not to mention the four foot speakers blaring ACDC and a perpetual keg on tap) drew me and my roommates in like a moths to a flame. It was a fun year...


Speaking of his roommates, they were cool too: a handsome blond trust fund baby, a long-haired rocker with a real mustache, an older intellectual "man" (I think he was a junior) and a Chinese/Greek guy who actually owned his own computer which took up half the room he shared with the rocker. They were awesome...outrageous, fun, cute and a little bit naughty...how could an uncaged Catholic girl like me not take a bite from that forbidden fruit?


Well, twenty-nine years and twenty nine pounds later...Charlie's still  blaring ACDC (much to our neighbors' dismay), those blues eyes still rock my world and he's still just naughty enough to keep this choir girl on her toes. We celebrated 20 years of wedded bliss last month...well, as much as we could given that Charlie was barely conscious from 2 1/2 hours of shoulder surgery the day before...ahhh to grow old together!


But, here's the beauty part...a new generation of Christensen boy is on the scene and he melts me more than I ever knew any boy could.


His 8th birthday was also in January and we celebrated with pizza, pals and this awesome castle cake made with love by Mamma.


But I think the most fun was delivering three dozen piping hot homemade honey buns to Will's classroom on his birthday for the whole class to enjoy. Of course, there was the test batch the week before and the leftovers the days that followed. I believe January is now officially the month of the "honey bun" in the Christensen household.

So, in honor of my two honey buns, I'd like to share the recipe with you. In the words of the illustrious Pillsbury dough boy, "nothin' says lovin' like somthin' from the oven..." and guaranteed...these will say it loud and clear like nothin' else!

I adapted a recipe for cinnamon buns and substituted honey for sugar. It makes for darker buns (you'll see in the photos) but the honey adds a nice flavor and it makes it so I can call them honey buns, which is enough reason for me. The full recipe follows as usual but here are some photos and a few tips...


Here's my secret weapon...really good vanilla. Never use imitation! This stuff is pretty pricey but Santa brings it to me every year in my stocking instead of perfume. I've been known to rub a little on my wrists and dab a little behind my ears so I figure Santa gets off easy if you look at it that way.


Do you ever notice that your recipes seem to call for too much flour? Here's the deal...when you measure your flour, don't forget to scoop it lightly into the cup then level it off, not pack it in like brown sugar. Real live bakers (which I am not) actually measure their ingredients by weight. A packed cup of flour vs. a properly measured one weighs almost an ounce more!

After mixing the wet stuff with half of the flour and letting it sit for a bit (this makes something called the "sponge") it's time to add soft butter and salt.


After adding the rest of the flour, you will have a soft, just a little bit sticky dough. Turn it out onto a floured surface and knead away...


When it's soft and silky, place it in an oiled bowl to rise for an hour or so...Now comes the fun part...punch it baby!


Time to shape your buns, so to speak. Roll the deflated dough into a 12 x 16 rectangle then spread with softened butter. If the dough wants to keep springing back, let it rest again for a few minutes and try again.

Sprinkle evenly with your sweet and cinnamony filling. I used dark brown sugar because that it was I had on hand but I recommend light. I think the dark sugar also contributed to the slight over-brownness of my buns.

Then roll, baby roll. Moisten one long end of the rectangle with water. Start at the other long end and begin to roll, tucking with your fingers as you go. You'll end up with something like this.

Use a long serrated knife and cut into 12 even slices then place evenly in the generously buttered pan, brushing the outer edges with melted butter to prevent them from sticking to each other.


 Cover and let rise until they look something like this. Aren't they cozy?

Bake for about a half hour until they are golden brown and cooked through. The honey makes them a little dark. Substitute sugar for the honey if you like your buns on the lighter side, so to speak.

I thought the pan made a cool design after I turned the warm buns out and just had to share. By the way, make sure you turn the buns out while they are still warm or the sugar will harden and they will become permanently fused to your pan. Not delightful on so many levels...


Drizzle your cooled buns with the sweet glaze all fancy like this or just smear it all over...that works too. I'm a big fan of the glaze and usually rip off pieces of the buns and scoop up the glaze left in the bowl. Whatever works for you!


Cinnamon Honey Buns


Dissolve in a large bowl and let sit for 5 minutes:
  • 1/4 cup quite warm but not hot water
  • 1 package (1/4 ounce) active dry yeast
Dissolve in a small bowl then add to above:
  • 1 cup warm milk
  • 1/3 cup honey (or sugar)
Add to large bowl, mix well with wooden spoon 100 strokes or so until mixed (I use my standing mixer):
  • 1 large egg, slightly beaten
  • 2 tsp. vanilla extract
  • 2 cups flour
Cover the bowl with plastic wrap and leave undisturbed for about 15 minutes until it is spongy.

Stir in:
  •  1 1/2 tsp. salt
  • 4 Tbs. soft butter
Add 1/2 cup at a time until a stiff but sticky dough forms:
  • 2 plus cups more of flour
Turn out onto a clean floured surface and knead until smooth and elastic (about 5-8 minutes). Place in a large oiled bowl, turn once, cover and let rise in a warm place until double in bulk (about 1 hour).
For the filling mix and set aside:
  • 3/4 cup light brown sugar
  • 3/4 cups chopped nuts (pecans or walnuts)
  • 2 tsp. cinnamon
When the dough has risen, punch it down a couple of times, turn it out onto your clean, lightly floured surface and knead for a minute or so. Let it rest while you generously butter a 13 x 9 baking pan.
Roll out the dough with a rolling pin to a 12 x 16 inch rectangle and spread with:
  • 4 Tbs. soft butter
Sprinkle your filling evenly over the butter then roll and shape as described in the photos above. Cover and let rise about 45 minutes until about doubled again and bake at 350 for about 30 minutes, until golden. Run a knife around the pan to loosen, invert onto a rack then turn upright to cool about 20 minutes before glazing.
For honey glaze, mix:
  • 1 1/2 cups powdered sugar
  • 2 1/2 Tbs. whole milk or cream
  • 2 Tbs. melted butter
  • 1/8 tsp. vanilla extract
  • 1/8-1/4 tsp. grated orange zest
  • Big squeeze of honey
Makes 12 buns for your honeys

Monday, January 3, 2011

Martha Stewart Makes Me Hyperventilate

I’ve loved magazines ever since I was a little girl.

I can still see the stack of Woman’s Days and Ladies' Home Journals piled up on the family room coffee table, dog-eared from Mom scouring them for the latest weeknight recipe ideas or shoestring home decorating tips. On weekends, I’d sit curled up with her, pouring through every page, reading about things from health tips on hot flashes to the miracle of modern microwave cooking.

We’d usually have an old Shirley Temple rerun on in the background and systematically organize our piles of plans for making over a room or transforming my next homemade birthday cake into some kind of gravity-defying masterpiece.

One of many Barbie cakes...

Every now and then we’d come across an especially inspirational tip and set it aside in a special pile reserved for enterprises sure to make us millions if we could just get them into mass production. I think my favorite was the DIY greenhouse I spotted one spring in Sunset Magazine and attempted to build, by myself, with a staple gun, scrap wood and sheet plastic. I think I was twelve and it lasted a whole summer until it buckled then collapsed under the weight of the macramé plant hanger I hung from the inside “beams” to make it look homey.

Making my macrame...check out the wallpaper.

When I turned thirteen I started to receive my very own Seventeen Magazine and a whole new list of must-dos materialized. The prom issue, of course, was the highlight of the year and arrived just in time for me to dream about my eighth grade graduation dance dress (the first Catholic school-sanctioned boy/girl event of my elementary career).

My favorite dress in that issue was a peach eyelet number with a halter strap, empire bodice and a floor-length tiered skirt…dreamy! Mom and I marched down to the fabric store and picked out a pattern, fabric and trim and set out to create our own couture piece. It was fabulous (although a bit maternity-looking in hindsight), with matching shawl…too bad my hair was growing out of a Dorothy Hamill wanna be debacle and I didn’t quite achieve the overall swingy, flowy, carefree, Seventeen, off-to-the-prom look I was going for…do ya think?

That's me in the pink...I wore it to freshman homecoming too. Doesn't my date look impressed?

That summer before my freshman year, there was an article on how to organize your high school locker with a handcrafted, pocketed fabric hanging door contraption (remember, this was the olden days before magnetic Container Store gadgets). I did my best to replicate the ingenious plan using only my wits and my Montgomery Wards starter sewing machine, and arrived the day before school to install my masterpiece. I remember being so proud as it “sort of fit just right” on the inside of my first locker door. I can’t remember how it attached but, being that it was before Velcro really took off, that thing flapped and swayed every time I opened my locker. I stubbornly suffered with it daily as my pens, pencils and Bonnie Bell Lip Smackers regularly flew into the breezeway, until the last day of freshman year.

Then came Martha Stewart…

I thought my plate was full before, but in walked Miss Martha with her monthly list of must-do’s from laminating just about every piece of paper in the house to breeding, drying, labeling, storing, sprouting, growing, harvesting, canning and then cooking with her extensive collection of heirloom tomato seeds. Oh, the guilt when I go to open a jar of generic marinara sauce and pour it over reconstituted, store-bought spaghetti. Let’s not forget that I still need to build that chicken coop and create handcrafted hot water bottle cozies out of last winter’s outdated cashmere sweaters. Did I mention the Hefty bag full of discarded men’s silk ties that I am unable to part with because I am supposed to use them in a five step, three day process that will  transform lowly eggs (from my imaginary chickens, of course) into spectacular Faberge-style Easter decor? How can I live without those in my life?

So, you get the idea. I have issues (no pun intended). Aren’t magazines designed to provide escape and entertainment? Not for me. When I open my mailbox and see that a new issue has arrived, I get that same feeling in the pit of my stomach when yet another box of See’s chocolates arrives at our doorstep over the holidays; on the one hand, I can't wait to dig in and devour what's  inside…on the other hand, I anticipate what will grow after my gluttonous feast. In the case of the chocolates…it’s my hips…in the case of the magazines, it’s my list of magazine, must-do’s.

So, “why,” you ask, do I bring this up now? Well, it is that time of year again and, even with my vow to keep it simple, I still managed to send myself into conniptions as I attempted to create homemade edible gifts for some of Charlie’s friends in business…one that would put a grin on even Martha’s pursed little lips.

After a few lackluster experiments with new recipes, Charlie suggested that I just share some of our family favorite Christmas cookies. Sounded reasonable enough and I did like the idea of going with the “tried and true.” What I forgot was that there is a reason why I only make these creations once a year…it takes forever!

Our sweet minions...
Ready to "ship out"...
Each recipe is really no biggie…it’s just when you have to make 240 of the little buggers, prepared and packaged in sanitary conditions (no licking the spoon), all delivered fresh and in tact…that’s when I remembered why my original plan of a simple bag of Cashew Brittle dumped in a cello bag and tied with a ribbon may have been the better way to go!


Here's the package we did end up with...

Oh well, after the first three batches, I knew I was in for it but the "toothpaste was already out of the tube," so to speak, and I knew there was no turning back. Carly helped me decorate the Fresh Ginger Boys and Girls, thank God, but she was also in the midst of finals so that was about all I could squeeze out of her. I was on my own for the next 180 little darlin’s.

Sugar and spice and everything nice...thank heavens for my little girl!

A bald ginger girl just won't do...
The Russian Tea Cakes were the easiest, I think. I love them any time of year and by any other name. I’ve also heard them referred to as Mexican Wedding Cookies and my neighbor Laura says her family calls them Swedish Heirloom Cookies.


Just one more sprinkle of powdered sugar...

Who doesn’t love a Thumbprint Cookie and this is my favorite recipe for them…another one out of my Mom’s old Betty Crocker cookbook (the Russian Tea Cakes are from there too).

Roll 'em in nuts and bake 'em for a few minutes...

Make the thumbprint, then bake 'em again...

Fill 'em. Eat 'em.

A while back I taught a holiday baking class for kids and added chocolate to the dough, deleted the nuts and used red jelly in the center divot. I called them Rudolph the Red-Nosed Cookies and the kids loved them even more!


What would I do without this cookbook?

Then, there are the infamous Candy Cane Cookies. I have no idea where this recipe originally came from but no Christmas is complete in our house without them…but they really are a pain in the patooty to make. The dough is easy enough (just a few ingredients)…it’s just that they are so labor intensive, each one needing to be hand rolled and twisted. The dough is super soft to work with and it takes a while to get the hang of twisting the two colors together without the cookie becoming a big gooey pink blob.


Gee…I bet you can’t wait to get started! It’s worth it though…trust me. They’re beautiful and delicious, albeit fragile (as carefully as I packaged them, I wonder if any of mine survived the ride in Charlie’s car as he made his deliveries).

Here they are all snuggled up and ready to be boxed...
Well, it's New Year's Eve as I write and I am happy to report that the last of the Christmas cookies has left the building. Much like out of town relatives, we loved them while they were here but are happy to see them gone! I think I'll go clean the fridge and get ready for all of that organic produce I plan to buy tomorrow.

Tonight's another story...it is New Year's Eve after all and we must ring in the year with a beautiful feast. As I reach to make my shopping list I find myself thinking WWMD (What Would Martha Do?). I start to gasp for air...fight it, Donna, fight it!

I think I've found my New Year's resolution!

For my cookie recipes, go to the following link. http://makemudpies.blogspot.com/p/christmas-cookies.html

There you'll find tattered copies of the four recipes mentioned above...no frills, handwritten notes and all. If I had taken the time to retype these, all pretty-like, I'm not sure if they would have made it to you by next Christmas. Tip: double click on each recipe to enlarge. Happy New Year!